Difference between revisions of "Installing Telstar"
| Line 20: | Line 20: | ||
== Pull the Images and Run the Containers == | == Pull the Images and Run the Containers == | ||
It is highly recommended that the Stacks feature of Portainer, inconjunction with a compose file is used to install and manage Telstar. But to get started quickly the following docker commands can be used. | |||
Pull the required images as follows (example shows amd64 image, see https://hub.docker.com/repository/docker/johnnewcombe/telstar/tags?page=1&ordering=last_updated) for the latest version for your architecture. | Pull the required images as follows (example shows amd64 image, see https://hub.docker.com/repository/docker/johnnewcombe/telstar/tags?page=1&ordering=last_updated) for the latest version for your architecture. | ||
Revision as of 17:03, 7 May 2022
It is recommended that Telstar is installed into a Docker environment. The required images are available from https://hub.docker.com/repository/docker/johnnewcombe/telstar. The following examples can be used to install and run Telstar. In addition examples are also given for orchestrating the services using both Docker Compose and Kubernetes.
To run Telstar using Docker, a minimum of two Docker images are required.
- The official Docker image mongodb
- The Docker image telstar
In addition, a Docker network will need to created to allow the images to communicate, and a Docker volume is desirable to allow for configuration changes and the addition of plugins.
Create the Docker Network and Volumes
The Docker network is used to allow communication between the TELSTAR application and the mongo database. The volumes provide a means to persist configuration data, plugins to be added and the mongo databse itself.
The following commands will create the resources required.
   $ docker network create telstar-network
   $ docker volume create telstar-volume
   $ docker volume create mongo-volume
Pull the Images and Run the Containers
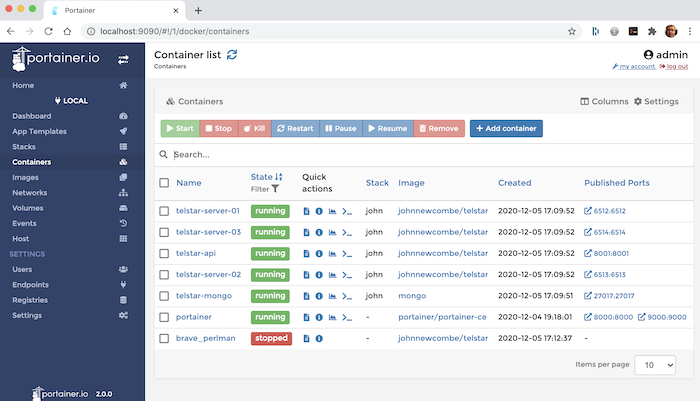
It is highly recommended that the Stacks feature of Portainer, inconjunction with a compose file is used to install and manage Telstar. But to get started quickly the following docker commands can be used.
Pull the required images as follows (example shows amd64 image, see https://hub.docker.com/repository/docker/johnnewcombe/telstar/tags?page=1&ordering=last_updated) for the latest version for your architecture.
   $ docker pull johnnewcombe/telstar:amd64-2.0-RC3.23 .
   $ docker pull mongo
Please note that the tag used with the official mongo image may need to be set to the system architecture that is to be used. Please see https://hub.docker.com/_/mongo.//
Start the mongodb container and connect it to the previously created network using the command below.
Please note that the '--name' parameter is important as it is used as part of the database connection string from the TELSTAR container.
$ docker run --name telstar-mongo --network telstar-network -v mongo-volume:/data/db -d -e MONGO_INITDB_ROOT_USERNAME=mongoadmin -e MONGO_INITDB_ROOT_PASSWORD=secret mongo
The Docker run command can be used to start the Telstar container and connect it to the previously created network. Note that in the example below the internal port is specified as 6512 and that this is mapped to the same port on the host system. This is also specified at the end of the command to inform TELSTAR that this is the port to listen on.
$ docker run --rm -d --name telstar-server --network telstar-network -p 6512:6512 -v telstar-volume:/opt/telstar/volume johnnewcombe/telstar:amd64-2.0-RC3.23 server --port=6512
In order to add some example content to the system, the init parameter can be used as in the example below.
$ docker run --rm -d --name telstar-server --network telstar-network -p 6512:6512 -v telstar-volume:/opt/telstar/volume johnnewcombe/telstar:amd64-2.0-RC3.23 server --port=6512 --init
If the --init switch is used as in the example above, the service will be running with some example content (see Example Content) and can be accessed using a suitable client.
In order to add additional content to the system the Telstar API can be used, this can be started as follows (see the Telstar API for mor details).
docker run --rm -d --name telstar-api --network telstar-network -p 8011:8011 -e TELSTAR_API_USERID=2222222222 -e TELSTAR_API_PASSWORD=1234 -e TELSTAR_COOKIE_SECRET=b6c7a826-96d6-4f45-88c4-3cf27cc2c647 johnnewcombe/telstar:amd64-2.0-RC3.23 api --port 8001 --init
The simplest way to test the system from a desktop machine is to use the Telstar Viewdata Client alternatively Telnet can be used. TELSTAR is not a Telnet application but telnet can be used to provide a sanity check e.g.
$ telnet <ip-of-docker-host> <port-used-for-telstar>
If the system is working, a display similar to the following would be shown.
   Connected to glasstty.com.
   Escape character is '^]'.
   20201128T1316Z
   L             TE
    ST
   Welcome
   $$$$$$$$$$$$$$$$$$$$$$$$$$$$$$$$$$$$$$$
            Welcome to theTELSTAR
              videotex service.
        You are connected toELIOT.
   $$$$$$$$$$$$$$$$$$$$$$$$$$$$$$$$$$$$$$$
   ...
The screen looks a little garbled simply because TELSTAR is a videotex application not a Telnet application.
Docker Compose and Kubernetes
In the examples above the Docker command was used to set up the system. Howevevr, it may be more appropriate to use Docker Compose See Orchestrating Telstar with Docker Compose. Telstar could even be implemented using Kubernetes, see Orchestrating Telstar with Kubernetes sections for other examples.
Configuration
Configuration options for the docker containers can be specified using environment variables, these can be specified as part of the docker run command or within the Docker Compose yaml file (see above). Full details of all of the available environment variables can be found in the section Configuration Options.
Portainer
The Docker environmemnt can be managed using Portainer, see Managing Telstar with Portainer.
