Difference between revisions of "Managing Telstar with Portainer"
(Created page with "# Managing Telstar with Portainer 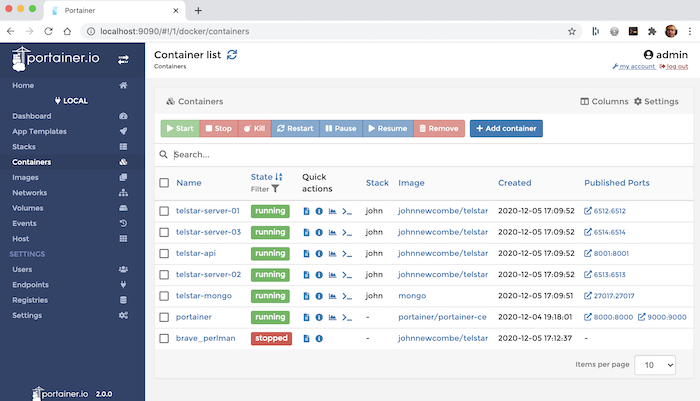 Portainer simplifies container management in Docker, Swarm, Kubernetes, ACI and Edge environments. It can be used to speed up software deployments and troubleshoot problems. Running Portainer on a local secure network is very simple as it can run within its own Docker container. Full details can be found at [https://www.portainer.io/](https://www.port...") |
|||
| (8 intermediate revisions by the same user not shown) | |||
| Line 1: | Line 1: | ||
Portainer simplifies container management in Docker, Swarm, Kubernetes, ACI and Edge environments. It can be used to speed up software deployments and troubleshoot problems. | Portainer simplifies container management in Docker, Swarm, Kubernetes, ACI and Edge environments. It can be used to speed up software deployments and troubleshoot problems. | ||
Running Portainer on a local secure network is very simple as it can run within its own Docker container. Full details can be found at | Running Portainer on a local secure network is very simple as it can run within its own Docker container. Full details can be found at https://www.portainer.io/. | ||
When using Portainer on a remote public server such as a DigtalOceam Droplet or other cloud server, security needs to be considered. There are several ways in which Portainer can be secured in a live environment, however, using a SSH Tunnel is one of the simplest. | When using Portainer on a remote public server such as a DigtalOceam Droplet or other cloud server, security needs to be considered. There are several ways in which Portainer can be secured in a live environment, however, using a SSH Tunnel is one of the simplest. | ||
| Line 11: | Line 7: | ||
When using a SSH Tunnel, Portainer is installed on the live server but is not exposed to the outside world. Instead a SSH Tunnel is created from a local machine to the remote machine. The installation of Portainer is then mapped to a local port. for example. | When using a SSH Tunnel, Portainer is installed on the live server but is not exposed to the outside world. Instead a SSH Tunnel is created from a local machine to the remote machine. The installation of Portainer is then mapped to a local port. for example. | ||
[[File:2827664245-portainer.png]] | |||
== Installation == | |||
Install and run Portainer on the live web server ensuring public access is denied within the firewall settings. Full details can be found at [https://www.portainer.io/](https://www.portainer.io/). This typically invloves creating a persistant volume and running the Portainer container e.g. | Install and run Portainer on the live web server ensuring public access is denied within the firewall settings. Full details can be found at [https://www.portainer.io/](https://www.portainer.io/). This typically invloves creating a persistant volume and running the Portainer container e.g. | ||
$ docker volume create portainer_data | $ docker volume create portainer_data | ||
$ docker run -d -p 8000:8000 -p 9000:9000 --name=portainer --restart=always -v /var/run/docker.sock:/var/run/docker.sock -v portainer_data:/data portainer/portainer-ce | $ docker run -d -p 8000:8000 -p 9000:9000 --name=portainer --restart=always -v /var/run/docker.sock:/var/run/docker.sock -v portainer_data:/data portainer/portainer-ce | ||
== Creating the SSH Tunnel == | |||
From a local machine execute the following command, changing the user and server to suit your own setup. | |||
ssh -L [LOCAL_IP:]LOCAL_PORT:DESTINATION:DESTINATION_PORT [USER@]SSH_SERVER | |||
For example if the Telstar server was myserver.co.uk, you could use. | |||
ssh | ssh -L 9090:myserver.co.uk:9000 john@myserver.co.uk | ||
The above example creates an SSH connection to | The above example creates an SSH connection to a server at ''myserver.co.uk'' using the username ''john''. An SSH certificate is used to access the server so no password is needed. In the command the ports are mapped such that the local port 9090, is mapped to the remote port 9000. | ||
Portainer is listening by default on port 9000 on the remote server. After executing the above command, the Portainer web interface can be accessed using the url | Portainer is listening by default on port 9000 on the remote server. After executing the above command, the Portainer web interface can be accessed using the url http//localhost:9090 on the local machine. | ||
Latest revision as of 08:43, 16 April 2022
Portainer simplifies container management in Docker, Swarm, Kubernetes, ACI and Edge environments. It can be used to speed up software deployments and troubleshoot problems.
Running Portainer on a local secure network is very simple as it can run within its own Docker container. Full details can be found at https://www.portainer.io/.
When using Portainer on a remote public server such as a DigtalOceam Droplet or other cloud server, security needs to be considered. There are several ways in which Portainer can be secured in a live environment, however, using a SSH Tunnel is one of the simplest.
When using a SSH Tunnel, Portainer is installed on the live server but is not exposed to the outside world. Instead a SSH Tunnel is created from a local machine to the remote machine. The installation of Portainer is then mapped to a local port. for example.

Installation
Install and run Portainer on the live web server ensuring public access is denied within the firewall settings. Full details can be found at [1](https://www.portainer.io/). This typically invloves creating a persistant volume and running the Portainer container e.g.
   $ docker volume create portainer_data
   $ docker run -d -p 8000:8000 -p 9000:9000 --name=portainer --restart=always -v /var/run/docker.sock:/var/run/docker.sock -v portainer_data:/data portainer/portainer-ce
Creating the SSH Tunnel
From a local machine execute the following command, changing the user and server to suit your own setup.
ssh -L [LOCAL_IP:]LOCAL_PORT:DESTINATION:DESTINATION_PORT [USER@]SSH_SERVER
For example if the Telstar server was myserver.co.uk, you could use.
ssh -L 9090:myserver.co.uk:9000 john@myserver.co.uk
The above example creates an SSH connection to a server at myserver.co.uk using the username john. An SSH certificate is used to access the server so no password is needed. In the command the ports are mapped such that the local port 9090, is mapped to the remote port 9000.
Portainer is listening by default on port 9000 on the remote server. After executing the above command, the Portainer web interface can be accessed using the url http//localhost:9090 on the local machine.